top of page
Ivory and Ash Grey Photo DIY Influencer
  • Instagram
  • Facebook
  • Pinterest
wheelbarrow2_edited.jpg
sheep2_edited.jpg
bedroom8.png
lambs.png
newyear1.jpg

“Where the home is, the heart is.

Our kitchen is the heart of our home. It’s a hub of noise, community, and activity, a gathering place for family and friends alike, which is why it’s so important to have a space that’s both functional and welcoming.

In the 80s, our little farmhouse kitchen underwent a makeover – it was gutted & refurbished with dark cabinets and paneling, with just one window for light. Yikes! If you have followed me for any length of time, then you KNOW the house has been a work in progress.

Some things just need a little extra TLC.

Our solution? We tackled the cabinets by sanding, painting and repairing them to bring some of the vintage country charm back to the farmhouse. No dark woodwork or closed spaces here!

One of the first (and most important) things we did was install recess lighting, which I dearly love, because it helped brighten the space. Despite this, I wanted another solution to give the kitchen that extra bit of warmth over the island we made. (Another vintage find and long DIY project – a story for another day!

I began to search for options that would best fit the aesthetic of our farmhouse...

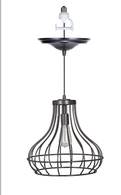
After scouring numerous home improvement stores for lighting options, to little success, I discovered an amazing find – a company called Worth Home Products. They sold lights that converted recess lighting into pendant lighting.

Imagine my excitement!

I set to work searching for the best option to fit my farmhouse kitchen. When I had questions, I called the company and they were so kind and helpful. I even managed to speak with the wonderful owner, Lori. I was so impressed with her customer service and interest in our home and project!

She offered many options for changing the lighting, and I was glad to have had the chance to get her input on what would work best.

After ordering two of the Brushed Bronze Recessed lights, it was installation time.

When they came I was thrilled to discover I could hang them myself.

Here’s How I Did It:

Step One: Remove the current light bulb.

Step Two: Screw in the new pendant light and slide up the decorative canopy.

Step Three: Step back and enjoy!

Now our cozy little kitchen space feels even more like home. It’s so nice to gather under the lights, and to have a more functional, well-lit room for entertaining guests.

Interested in trying Worth Lighting for your space? Here are my top picks for a vintage farmhouse: (ALL instant pendant style & a breeze to install!)

Left to Right:


If you have followed me for any length of time you know that this old house is a work in progress. When something is built almost 200 (!) years ago there are a few things that may need a little fix. We have sanded, stripped and repaired almost every square inch but, believe it or not, there are still places that need work.

We live in a real-life fixer upper; unfortunately there are no crews of people coming in to save the day...we roll up our sleeves and do it ourselves!

I've wanted to update the kitchen since we moved in, but it's been a very slow process. Let's face it -we live on a budget! Our countertops would stay but we were finally going to give this farmhouse kitchen a real farmhouse sink.

So, I began to search for top-quality sinks that would best fit the aesthetic of our farmhouse...

After searching many home improvement stores for a farmhouse sink I found a brand that was very well built and pleasing to the eye from @sinkology. I was also SO excited that this brand could be found in our local Home Depot store! This made the process of viewing and touching the sinks that much easier.

I decided to go with the Brooks/Zuri All-In-One Kit. I loved the look of the sink and the elegance plus functionality of the faucet.

Since we were doing it ourselves, we needed to cut the corian countertops and install the sink. Thank heavens my husband is very handy and a jack-of-all-trades! (He's been commissioned for more than one farmhouse renovation project.😉) He did a ton of research & then started the project.

STEPS:

1. Removal of the built-in sink.

2. Next, the hubby built a bottom support for the sink to sit on.

2. Finally, we were ready to put the sink in place and hook up all the plumbing!

Installation! Getting things polished up.

I want to stress that my husband is NOT a plumber or carpenter but he was able to install the sink and reroute all the plumbing - with a little elbow grease and research, it's a cinch!

It helped that the folks over @sinkology were there with us every step of the way. Their customer service is top notch and the quality and craftsmanship of the product is supreme.

Here is the finished product! I couldn't be happier with how it turned out!

Recent Posts

Closing.JPG
Life's sweeter with community. Let's be
sheep5_edited.jpg
  • Instagram
  • Facebook
  • Pinterest
IMG_3939.JPG

Looking to Collaborate? 

DESIGNED BY MCCOWAN MARKETING

EST. 2017 | 2020

BE A LIGHT, SHINE BRIGHT

bottom of page